Your Email Setup Journey
Why Professional Email Matters for Your Business
Your email address is often the first impression you make
Using a professional email address like [email protected] instead of a generic Gmail or Yahoo address helps you:
- Build credibility with customers and partners who see you take your business seriously
- Strengthen your brand by including your business name in every email you send
- Look professional in proposals, invoices, and client communications
- Keep work separate from personal email for better organization
- Gain customer trust - studies show 90% of customers find branded emails more trustworthy
Step 1: Access Your Email Management
Everything starts in your client area
Log Into Your Client Area
- Visit your client portal at the URL provided in your welcome email (https://www.webops.host/clientarea.php)
- Enter your credentials - your email address and the password you created during signup
- Click "Login" to access your dashboard

Navigate to Your Hosting Service
- From your dashboard, look for the "Services" menu or "My Products & Services" section
- Click on your hosting plan - it will display your domain name and plan type (Starter, Business, or Growth)
- You'll see your service details page with various management options

Open Email Addresses Management
- On your hosting service page, scroll down to find the management options
- Look for "Email Addresses" in the list of available features
- Click "Email Addresses" to open the email management interface
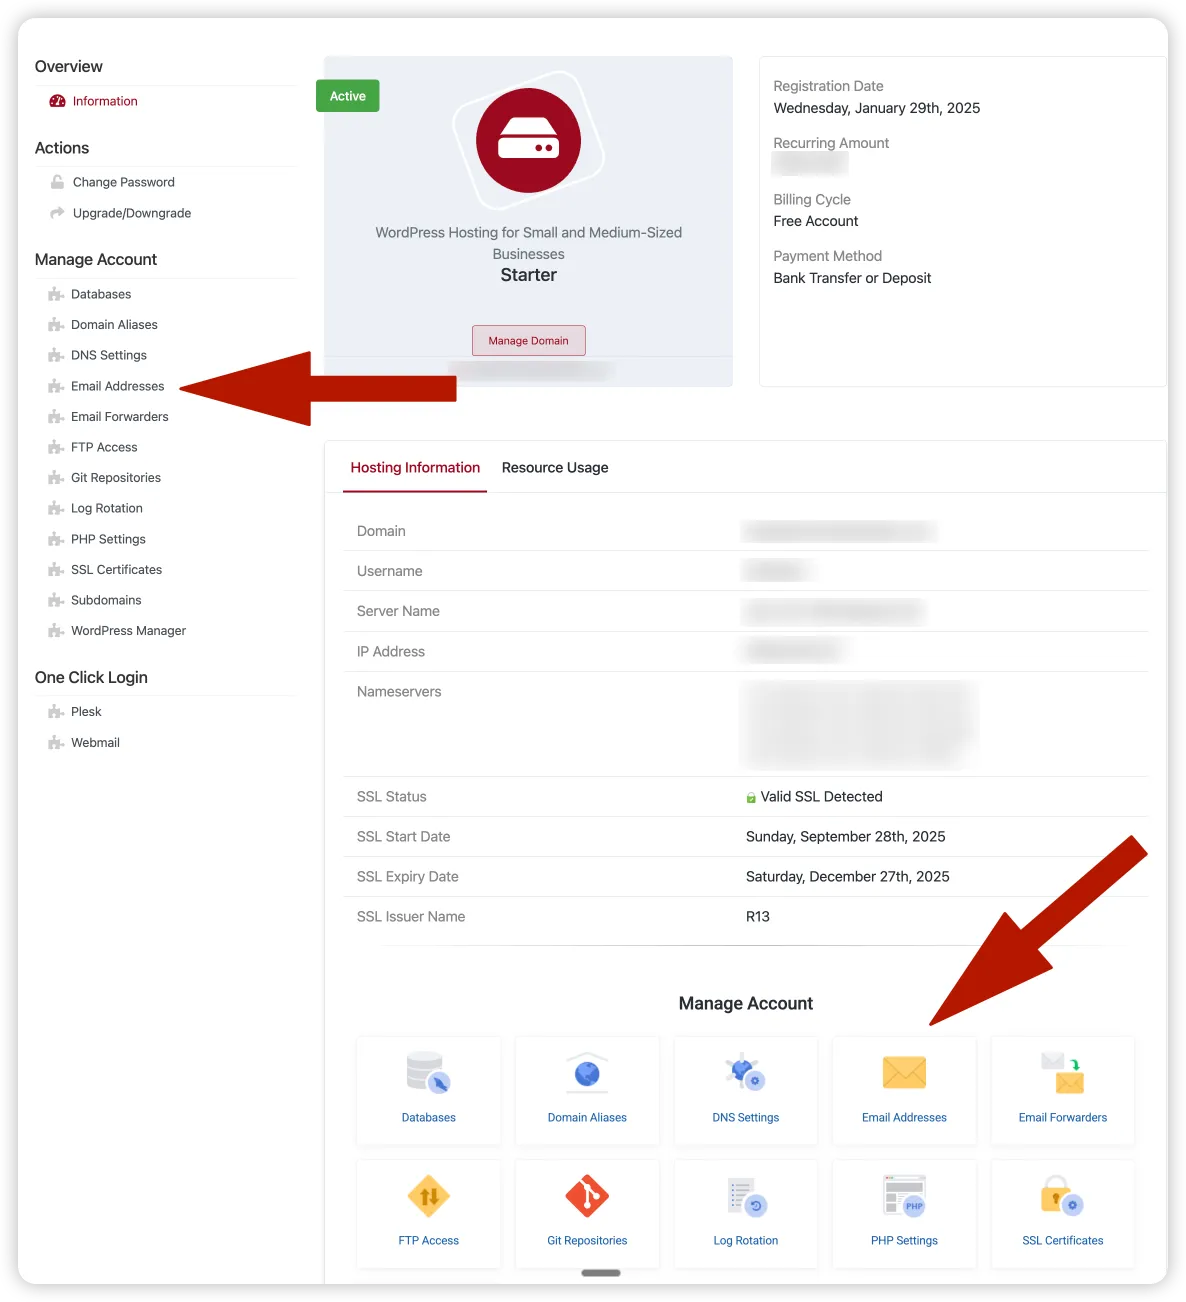
You're now in your email management area! This is where you'll create and manage all your professional email addresses.
Step 2: Create Your First Email Account
Let's set up your professional email address
Add a New Email Account
- Click the "Add Email Account" button at the top of the Email Addresses page
- A form will appear with several fields to complete
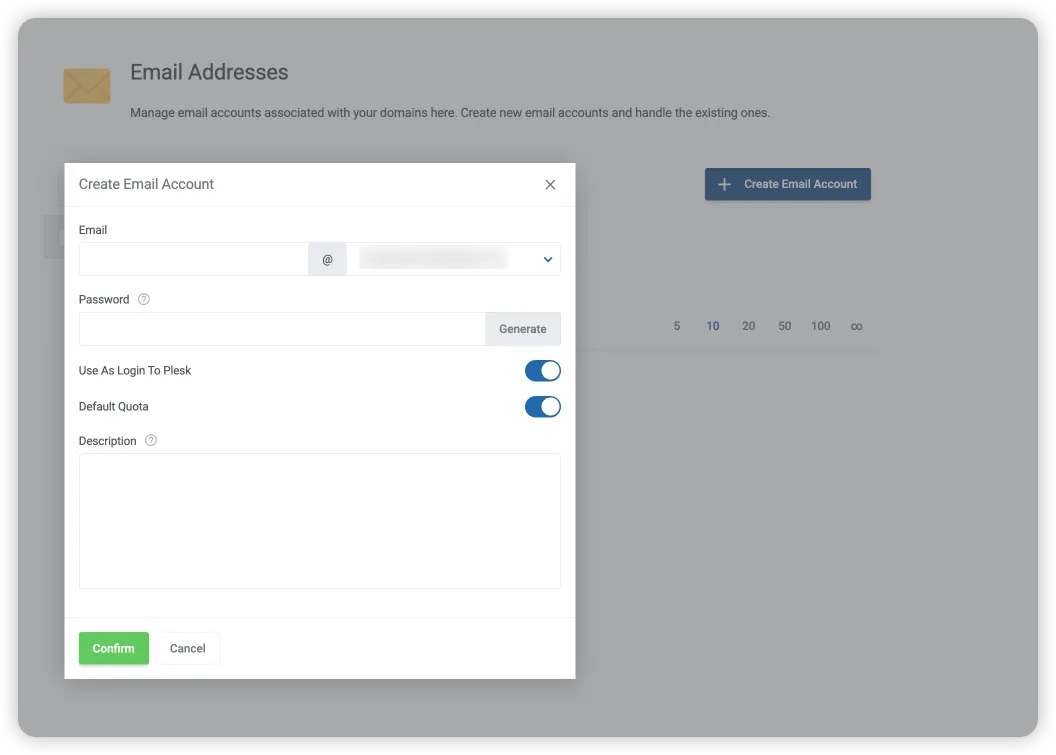
Fill in Your Email Details
Here's what each field means and how to fill it in:
Email Address / Username
Enter the part before the @ symbol. For example, if you want "yourname@yourdomain.com", just type "yourname"
- hello@ or contact@ - Friendly alternative to info@
- support@ - Customer service and help requests
- sales@ - Sales inquiries and quotes
- yourname@ - Personal business email (e.g., john@yourbusiness.com)
Pro Tip: To reduce the volume of spam you receive, avoid creating an "info@" email address!
Select Domain
Choose which domain this email should use. If you have multiple domains on your account, they'll all appear here. Most people will have just one domain to choose from.
Password
Create a strong password for this email account. We recommend:
- At least 12 characters long
- Mix of uppercase, lowercase, numbers, and symbols
- Something unique (not reused from other accounts)
Tip: Use the "Generate Password" button to create a secure random password. Make sure to save it somewhere safe!
Mailbox Quota (Storage Space)
Choose how much storage this email account can use:
- Unlimited: No storage restrictions (recommended for most users)
- Limited: Set a specific size limit if you want to control storage usage
For most business use, we recommend selecting "Unlimited" so you never have to worry about running out of space.
Complete Email Creation
- Review your settings to make sure everything looks correct
- Click the "Create Account" or "Add Email Account" button
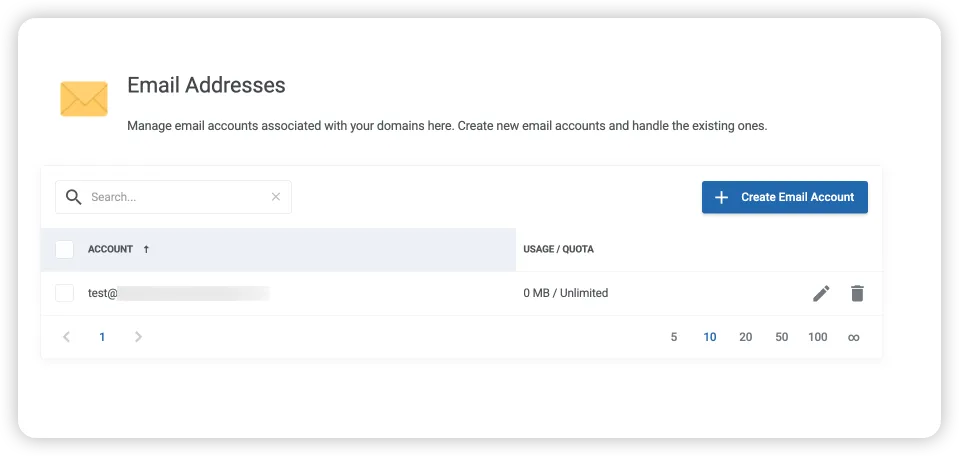
- Wait for confirmation - you should see a success message within a few seconds
- Your new email will appear in your Email Addresses list
Creating Additional Email Addresses
Need more email addresses? No problem! Simply repeat the process above. Common scenarios include:
- Multiple team members: Create separate email addresses for each person (john@, sarah@, mike@)
- Different departments: Sales, support, billing, and marketing can each have their own
- Special purposes: Create addresses for specific projects, forms, or automated notifications
All email addresses are included free with your hosting plan - create as many as you need!
Step 3: Set Up Email on Your Devices
Access your email from anywhere - computer, phone, or tablet
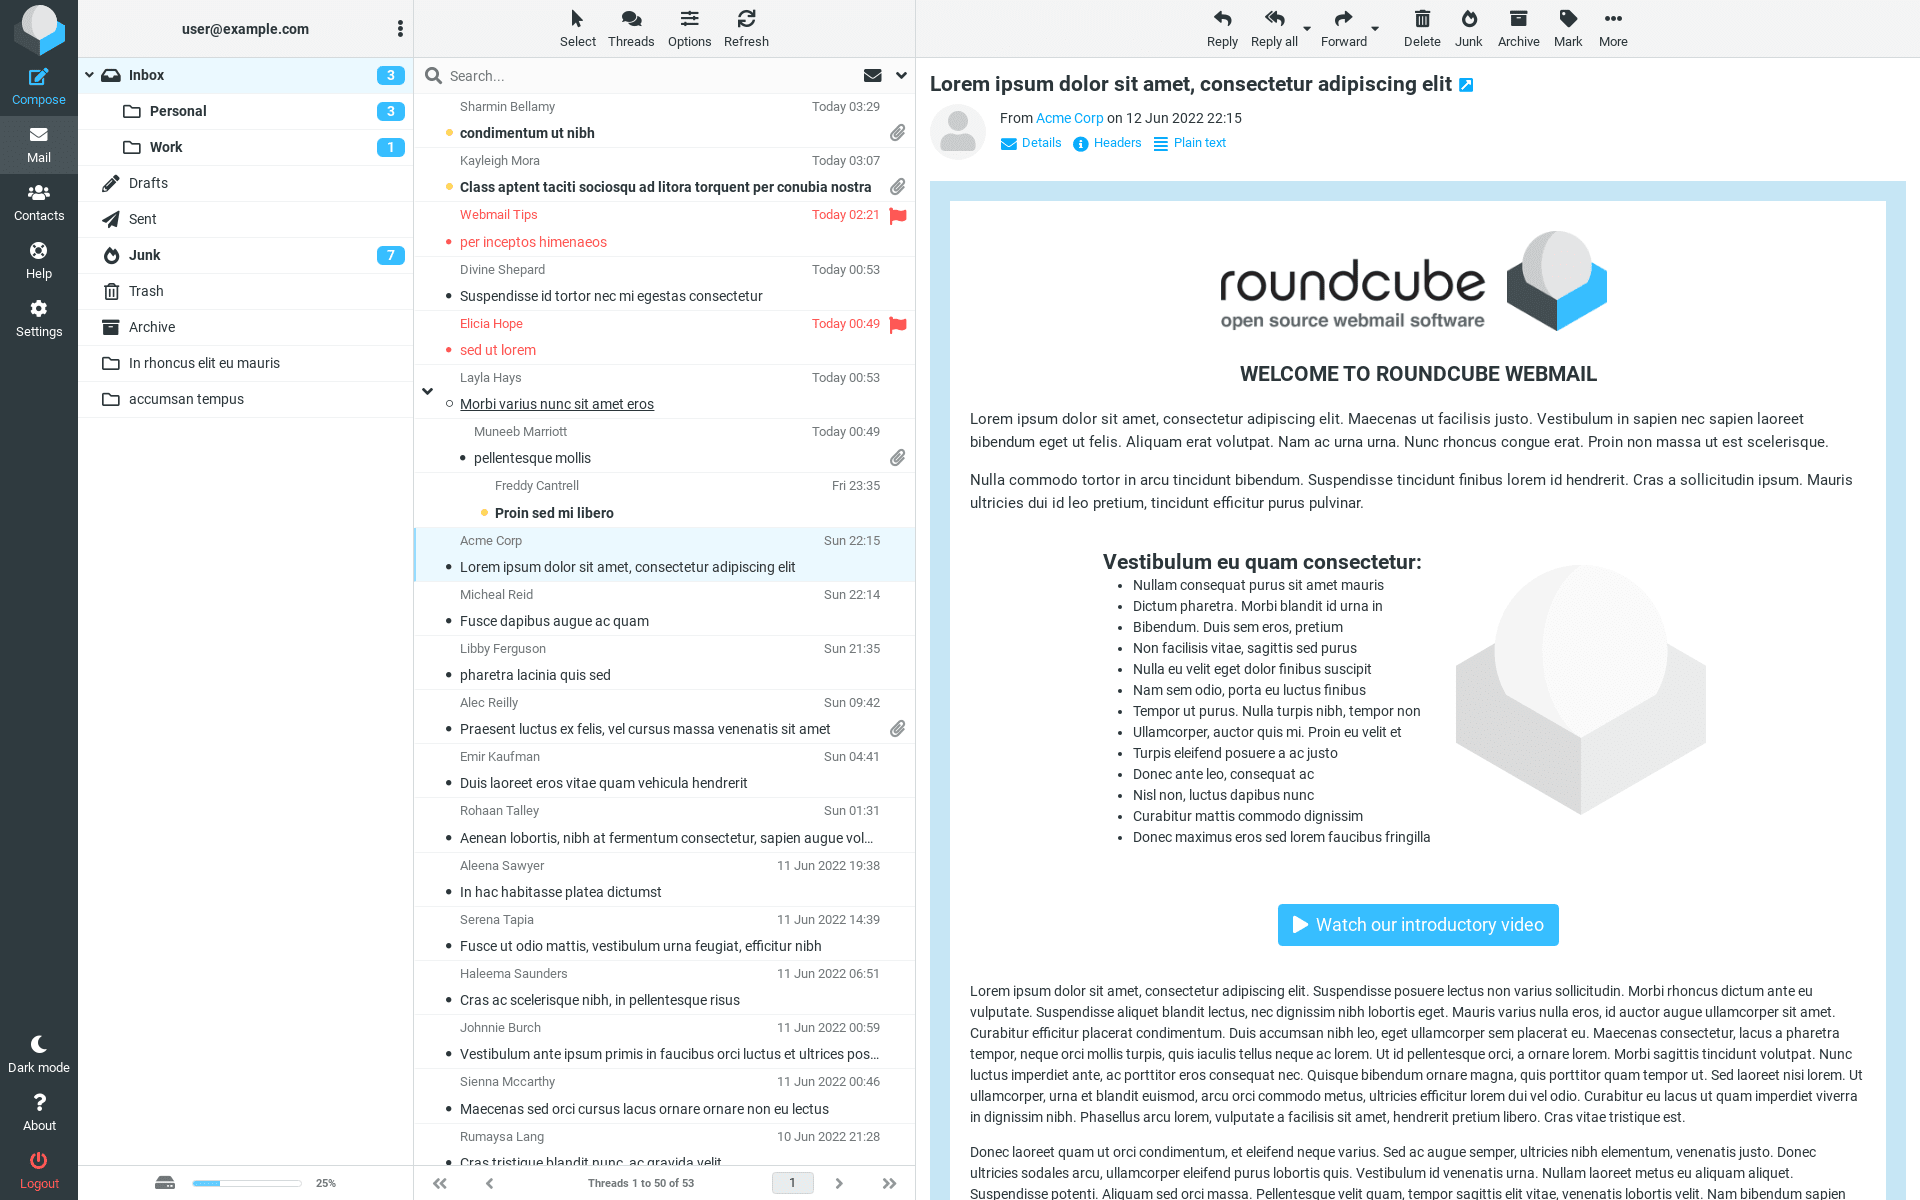
Option 1: Access via Webmail (Easiest!)
Webmail is the simplest way to check your email - no setup required! Just log in through your web browser.
- Return to your Email Addresses page in the client area
- Find the "Log In To Webmail" button (usually at the top of the page)
- Click it, and you'll be logged in automatically to your webmail interface
- Start using your email! You can send, receive, organize, and manage everything from the webmail interface
Option 2: Configure Email Apps on Your Devices
For a better experience with notifications and offline access, set up your email in apps like Outlook, Apple Mail, Gmail app, or your phone's mail app.
- Email address: Your full email (e.g., [email protected])
- Password: The password you created earlier
- Incoming server: mail.yourdomain.com
- Outgoing server: mail.yourdomain.com
Not sure about these settings? They're displayed in your client area, or just contact support and we'll provide them!
Device-Specific Instructions
Windows / Outlook
Open Outlook, go to File → Add Account, enter your email and password. Outlook will attempt auto-configuration. If manual setup is needed:
Account type: IMAP
Incoming server: mail.yourdomain.com
Port: 993 (SSL)
Outgoing server: mail.yourdomain.com
Port: 465 (SSL)
Mac / Apple Mail
Open Mail, go to Mail → Add Account → Other Mail Account. Enter your email and password. Apple Mail will try to configure automatically. If needed, use manual settings:
Account type: IMAP
Incoming server: mail.yourdomain.com
Port: 993 (SSL)
Outgoing server: mail.yourdomain.com
Port: 465 (SSL)
iPhone / iPad
Go to Settings → Mail → Accounts → Add Account → Other → Add Mail Account. Enter your info:
Name: Your name
Email: [email protected]
Password: Your password
Description: Work Email
iOS will auto-configure the servers. Tap "Save" when done!
Android
Open Gmail app or your device's Email app → Add Account → Other. Enter your email and password. If manual setup is required:
Account type: IMAP
Server: mail.yourdomain.com
Security type: SSL/TLS
Port: 993 (incoming)
Port: 465 (outgoing)
Test Your Email Setup
Let's make sure everything works correctly:
- Send a test email to yourself from another email address
- Check that you receive it in your newly configured account
- Reply to the test email to confirm sending works
- Check on multiple devices if you configured more than one
Managing Your Email Accounts
Common tasks you can handle yourself
Changing Email Passwords
Need to change an email password? It's easy:
- Go to your Email Addresses page in the client area
- Find the email account you want to update in the list
- Click the "Edit" or "Manage" button next to that account
- Enter a new password (or use the "Generate Password" button)
- Click "Save Changes"
Adjusting Storage Quotas
You can change how much storage space each email account uses:
- Navigate to Email Addresses in your client area
- Click "Edit" or "Manage" next to the email account
- Modify the quota setting to your desired limit (or choose unlimited)
- Save your changes
We generally recommend keeping email accounts on "Unlimited" storage unless you have a specific reason to limit them.
Deleting Email Accounts
To delete an email account:
- Go to your Email Addresses page
- Find the account to delete in your list
- Click the "Delete" button (often a trash can icon)
- Confirm the deletion when prompted
Checking Email Storage Usage
You can view how much storage each email account is using:
- The Email Addresses page displays storage information for each account
- You can see both used space and total quota
- This helps you identify accounts that might need quota adjustments
Troubleshooting Common Issues
Solutions to the most frequent email problems
❌ "Cannot connect to email server" error
Common causes and solutions:
- Check that you're using the correct server name: mail.yourdomain.com
- Verify you're using the right ports (993 for IMAP incoming, 465 for SMTP outgoing)
- Ensure SSL/TLS is enabled in your email app settings
- Confirm your email password is correct
- Check your internet connection
📧 "Username or password incorrect" error
Try these solutions:
- Make sure you're entering your FULL email address as the username ([email protected], not just "info")
- Check for typos in your password - it's case-sensitive
- Reset your password in the client area and try again
- Ensure there are no extra spaces before or after your email/password
📥 Email receiving works but sending doesn't
This is usually an outgoing server configuration issue:
- Verify SMTP authentication is enabled (requires username and password)
- Check that the outgoing server is set to mail.yourdomain.com
- Confirm you're using port 465 with SSL/TLS
- Some ISPs block port 25 - try port 587 as an alternative
⚠️ "Mailbox quota exceeded" error
Your email account is full:
- Delete old emails and empty your trash/deleted items folder
- Remove emails with large attachments
- Increase your quota limit in the client area (or switch to unlimited)
- Archive old emails to your computer to free up server space
🔄 Email not syncing between devices
Make sure all devices are using IMAP (not POP3):
- Check each device's email account settings
- Confirm all are set to "IMAP" account type
- If using POP3, delete the account and set it up again with IMAP
- Wait a few minutes for sync to occur after making changes
📭 Not receiving emails from certain senders
Check your spam folder and email filters:
- Look in your spam/junk folder - the email might be there
- Add the sender to your contacts/safe senders list
- Check if you have any email filters that might be blocking the sender
- Ask the sender to check if they received a bounce-back message
- Contact our support team to verify the email isn't being blocked server-side
🐌 Email is very slow to send/receive
Performance troubleshooting:
- Check your internet connection speed
- Try accessing email from a different network (like mobile data)
- Clear your email app's cache
- Reduce the number of emails stored on the server by archiving old ones
- Contact support if the issue persists - we can check server performance
Still Need Help?
Our support team is here to help you with email setup and any issues you encounter. We can:
- Configure your email on any device for you
- Troubleshoot connection problems
- Provide your specific mail server settings
- Help with advanced configurations like email forwarding
- Walk you through any step that's confusing
Contact Support:
Email: support [at] webops.host
Support Portal: Available through your client area or at www.webops.host/submitticket.php
Hours: 9am-5pm, 7 days a week (24/7 for emergency requests)
Email Best Practices
Tips to get the most from your professional email
Security Best Practices
- Use strong, unique passwords for each email account
- Change passwords regularly (every 3-6 months is ideal)
- Be cautious of phishing emails - don't click suspicious links or download unexpected attachments
- Never share your email password with others
- Log out of webmail when using public computers
- Enable two-factor authentication if available for your client area
Organization Tips
- Create folders to organize emails by project, client, or topic
- Use descriptive subject lines when sending emails
- Set up filters/rules to automatically organize incoming mail
- Delete or archive old emails regularly to keep things tidy
- Unsubscribe from newsletters you no longer read
- Use signatures with your contact info and professional details
Professional Email Etiquette
- Respond promptly to business inquiries (within 24 hours when possible)
- Use professional language and proper grammar
- Keep emails concise and focused
- Include a clear subject line that summarizes your email
- Proofread before sending to catch typos and errors
- Use your professional email for all business communications
Backup Recommendations
While we backup your email data daily as part of your hosting service, we recommend keeping local backups of critical emails:
- Use IMAP so your emails are stored on the server and on all your devices
- Archive important emails to your computer periodically
- Save critical attachments to cloud storage or your hard drive
- Export contact lists regularly to prevent data loss
Next Steps for Your Website
Now that your email is set up, what's next?
Get Your Website Live
If you haven't already, launch your website with our Website Jumpstart service. We'll have you online in 24 hours.
Set Up Email Forwarding
Want emails from one address to automatically go to another? Set up email forwarders in your client area.
Professional Email Signature
Create a professional email signature with your contact details, logo, and social media links.
Content Updates
Need help updating your website regularly? Our Content Operations team can handle that for you.